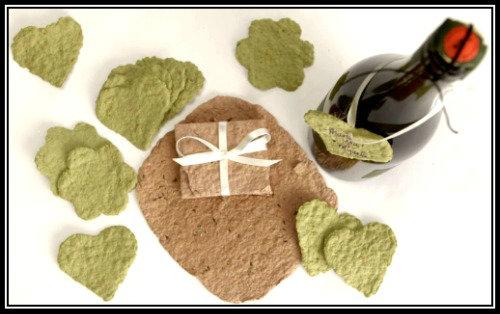
Homemade plantable seed paper is a simple DIY project that can be done at home in a very short time. It can be used in a variety of ways. Given that I enjoy hosting parties and gathering, I use homemade plantable seed paper as memorable party favors and gift tags!
What I love most about homemade plantable seed paper is that you recycle paper items that normally go to waste, like toilet paper rolls, while also providing a beautiful keepsake that will grow and provide beauty and nourishment for years to come!
What you’ll need:
- Cardboard toilet paper rolls
- Seeds
- Food processor
- Hot water
- Parchment paper or plastic wrap
- Cookie cutters in a variety of shapes
- Hairdryer
- Food dye (optional)
- Tissue paper, preferably without dye (optional)
- Ribbons
Instructions:
- Cut toilet paper rolls into small pieces and shred tissue paper.
- Add shredded tissue paper and toilet roll pieces to a bowl and pour boiling water into bowl, covering paper.
- Add soaked shredded paper, with enough water to cover the paper, into a food processor or hand blender. At this point, you can also add food coloring, if desired. Blend until all lumps are removed – it should look like a mushy pulp.
- Spoon pulp back into bowl. With hands, add seeds to pulp, stirring gently to combine. Note: Do not blend seeds. In order to avoid damaging the seeds, this step must be done by hand.
- Lay parchment paper, or plastic wrap, onto a flat surface and place cookie cutters on top of covered surface. Squeeze pulp gently to remove some water, leaving it moist enough to form shape. With hands, add a small amount of pulp into cookie cutters. Press gently into cookie cutter shape. This will also remove excess water. (Note: you can also spoon pulp directly onto surface and use a rolling pin to flatten pulp into sheets.)
- Remove cookie cutter (if applicable) and blot seed paper / shapes with a towel to remove any excess liquid. At this point, if desired, rubber stamps can be used to embed a design into the paper.
- On a cool setting, blow dry the shapes / paper with a hair dryer. Make sure to use a low setting. You don’t want to blow the seeds out! (This step is important, because you don’t want the seeds to begin germination before they are planted.)
- Remove paper from parchment paper. Place same in a dry area, away from the sun. Let the paper sit until completely dry.
- Once dry, decorate however you’d like. Use a hole punch and ribbon, pens, or whatever you’d like!
Tips:
- Use food dye to change the color of the paper.
- Before the paper dries, embed a design in your homemade plantable seed paper with a rubber stamp. Or, use a child’s toy, like a toy truck – just press and roll the tires right over it!
- When gifting, make sure to note the type of seeds used, and provide planting instructions. You want to make sure they grow and provide years of beauty or nourishment!
This post originally appeared on Latina On a Mission.


The views and opinions expressed in this post are those of the author(s) and do not necessarily reflect those of MomsRising.org.
MomsRising.org strongly encourages our readers to post comments in response to blog posts. We value diversity of opinions and perspectives. Our goals for this space are to be educational, thought-provoking, and respectful. So we actively moderate comments and we reserve the right to edit or remove comments that undermine these goals. Thanks!